Friends,
From time to time, I share samples of my paintings with you. But I have never shown you how an idea comes to life, or what stages a painting (in this case, mine) goes through before it is completed.
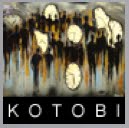
This piece is called GENESIS; and I finished it 20 minutes ago. The idea came to me in form of an image-as it always does-and I could clearly see the end result in my minds eye as I set to create it.
Forgive the poor quality images. I took them using my iPhone as I was working on this piece (hand were simply too dirty to whip out the good camera).
Stage 1: For the smaller circular objects, I used metal washers (found in any hardware store) of varying sizes.
The larger circles are cut out from a very flexible plastic foam.
The intention was obviously to create a progression of circular objects that grow larger a the eye ascents to the top of the painting. I wanted to make it look like the circles are "bubbling" upward as they are generated and grow to maturity!
So, in stage 1, the basic material is laid out (canvas, washers, cut out circles). One the layout looked good, I glued all the pieces to the canvas.
The bottom pieces, which are the metal washers were applied after I applied a thick layer of Acrylic medium to the canvas, shaped it to the desire texture and thickness; and then, simply through the washers onto it (one by one).
Stage 2: Most of you know that one of the "signature" attributes of my paintings is the application and use of extreme texture. To do so, I used construction drywall patch putty and applied it to the rest of the canvas. I then use various instruments to apply the material, shape it, and create the designs that I want.
Stage 3: Once the canvas dries (I'm often too impatient, so I blow dry it to make it dry faster). I apply the full coating of the base color. I chose black because it helps bring out the texture later when the final coat colors are applied.
Stage 4: Once the base coat is dry. I apply the main color which in this case was red. By this point, the combination of the textured surface, the black undercoat and the vivid red do their magic and bring out all the hidden shapes and forms.
I then paint all the circles in metallic silver. This step obviously take the most time because most attention to detail goes into this action.
Once the red and silver are dried. The top coats of fiery orange and algae green are applied with a very stiff brush with uneven bristles.
This step is the most crucial and scary part of the project! If the brush strokes are too rough, or if too much or too little paint is applied, or if the brush is too wet or too dry, the painting is ruined and there is no going back! To the garbage can goes hours of work!
Stage 5: Once the painting is completely dry (I usually wait a week), a thick layer of glossy coat is applied to the painting to give it a nice glossy shine, protect the colors, and to give it depth (obviously, I have not completed this stage yet; and will have to wait until next weekend).
I hope you enjoy "GENESIS".